Wednesday, October 29, 2014

Quick &!easy co-workers gift ideas

With the holidays fast approaching I know people are in need of some quick & not so expensive gift ideas for friends at work & perhaps your extended family members who you only see at Christmas. Well here are a few to get you started. If you are paper crafter the. You probably have lots if the materials needed for these projects in your craft room.

This is one if the oldest tricks in paper crafting & that is merely covering up something drab and making it super cool...usually done with papers & stamps. 

Here's how we get started: you'll need some paper scraps, some adhesive and some blank books spiral bound or

And just get to work covering them by cutting the paper to fit the front of the tablets and adding some fun little clusters of embellishments - you could make them cute, sweet or keep them simple. 


How cute would these look on your co-workers desk?


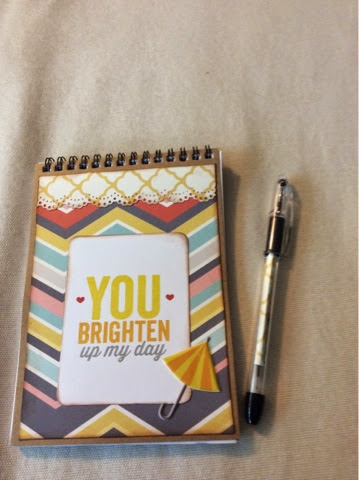
How about adding a matching pen...


The one above is just a pocket sized paper pad....purse size = fun size! 


This one is the one above the large white booklet that holds white paper the cover is hard covered just like a book.  Even added some fun little embellishments to some of the pages inside - these would be fun for a road trip so your kids could draw some pictures or play tic tac toe....


But you see what I mean by easy inexpensive gift ideas - cheap enough to make a bunch but decorated just right to make them look like something you put a lot if time into! Ain't that was the holiday season is about?

Happy crafting - I'm linking this up to parties above.

xo


Tuesday, October 28, 2014

Craft show set up or home decor - your choice

This past weekend we participated in our annual craft show, it's a really big show and for years I have been trying to get my displays for my booth just right - well this year I had a vision ( da-da-da) and had been saving these 4 frames for another project and once I sprayed them with some fantastic colors it hit me. 


A jewelry display for my booth that way all the pieces could be seen and not look to cluttered. As I was playing with these frames and setting it up for my husband to screw them together - I thought - Wouldn't this look cool in a bedroom or living room as a large wall piece maybe to add smaller art work inside or perhaps kids artwork...I mean really - what a statement this would make on a wall!


Anyway he show was a success and we did really well. Here are some really bad photos of my layout - again a bunch if stuff had been purchased so I was trying really hard "spread" things around. 


The sun was so bright behind us and so hence the dArkness.  


Here is another piece I redid for my booth set up - it's a baby changing table that my husband made slat for to act as the shelves... Then I added a ruffle to he bottom to hide stuff under there. 


Anyway, I came home with a lot less stuff. Yeah and thanks again to my wonderful customers...love you guys!

I am linking this up to the parties above. Happy crafting!
 
XO


Monday, October 13, 2014

String art

To be truthful - I thought this was going to be a no brainer. Something I could do while watching t.v. Boy was I wrong. The premise is simple the idea looks easy but when you are working on such a small space with nails so close together keeping the strings close to the base of the nails is necessary to keep the alignment looking right all the way around the piece. Well, I tried it twice and it can be even better so I will go again for my 3rd try...here are my first attempts - skull head ( the nose is a bit wonky) 


Then I tried a ghost - a bit better but still need to capture the face a bit better


I think I need a larger working area---or a bigger face 😃


Here they are right next to each other. I like them but I need to try it again. To get the face 
Poking just right. Hope you give this a try and good luck with your Halloween decorating! I am linking this up to the parties above. 

Have a crafty week!
xo


Wednesday, October 8, 2014

Recycled Chalkboards


I love to give old things a new life. I usually make-over furniture, large furniture...like hutches, tables & chairs and the like. But recently I took a trip to the local Habititat for Humanity and if you have never been there  you really should search one out. They carry a bunch of old pieces of stuff, nails, screws, tile and furniture that goes for real cheap. I could spend hours in there scoping out junk to bring home and re-do.

Back tracking - in recent months I have seen the chalkboard really boom in the decorating scene. From the small chalk board stickers to the large kitchen walls being re-done and so on. I have made them from just about anything I could find well I found these really cheap old kitchen cabinet drawers at Habitat for Humanity and thought these would work well for my version of the chalkboard...

I started with these 


Just your typical small kitchen cabinet drawers  

first I sanded them with a hand sander 


Then I spray spainted them with my favorite colors...and used some chalk board paint - I gave it 2 coats - make sure it dries between coats because if you rush thru it then you will life up the paint you previously put on...trust me I learned this the hard way!


Once it was completely dry - I conditioned the board by rubbing chalk all over the board and then erased it. and then did it again.


See how smooth the chalk glides onto the board - best part is you can use a wet paper towel and wipe it down if you are not a fan of the chalk residue and WAIT for it to dry then use as usual.


sweet and functional - love that. I am definitely making another trip to the Habitat for Humanity store.

Hope all your to-do projects are coming along. Happy HUmp day!

I am lnking this up the parties above.

xo


Saturday, October 4, 2014

WCMD round 2

Halloween & Thanksgiving this time. 


Happy card making & have a great weekend! 

xo


WCMD halloween style

I have wanted to play along with national WORLD CARD MAKING DAY for awhile now. This is the year that I will participate so here are my cards.


In the process of making a few more. Back to crafting!!!! 

xo